Developer Guide
- Acknowledgements
- Setting up, getting started
- Design
- Implementation
- Documentation, logging, testing, configuration, dev-ops
- Appendix: Requirements
- Appendix: Instructions for manual testing
Acknowledgements
-
Opencsv is used when creating the CSV file in
mailingListcommand.
Setting up, getting started
Refer to the guide Setting up and getting started.
Design
.puml files used to create diagrams in this document can be found in the diagrams folder. Refer to the PlantUML Tutorial at se-edu/guides to learn how to create and edit diagrams.
Architecture
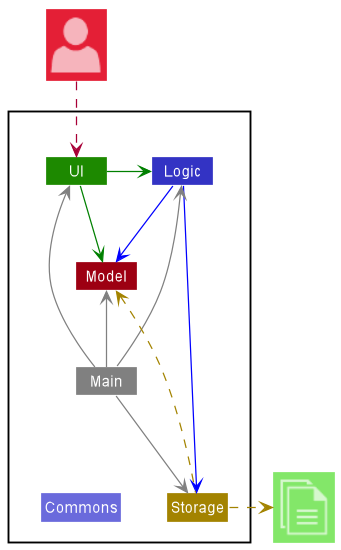
The Architecture Diagram given above explains the high-level design of the App.
Given below is a quick overview of the main components and how they interact with each other.
Main components of the architecture
Main has two classes called Main and MainApp. It is responsible for,
- At app launch: Initializes the components in the correct sequence, and connects them up with each other.
- At shut down: Shuts down the components and invokes cleanup methods where necessary.
Commons represents a collection of classes used by multiple other components.
The rest of the App consists of four components.
-
UI: The UI of the App. -
Logic: The command executor. -
Model: Holds the data of the App in memory. -
Storage: Reads data from, and writes data to, the hard disk.
How the architecture components interact with each other
The Sequence Diagram below shows how the components interact with each other for the scenario where the user issues the command delete 1.
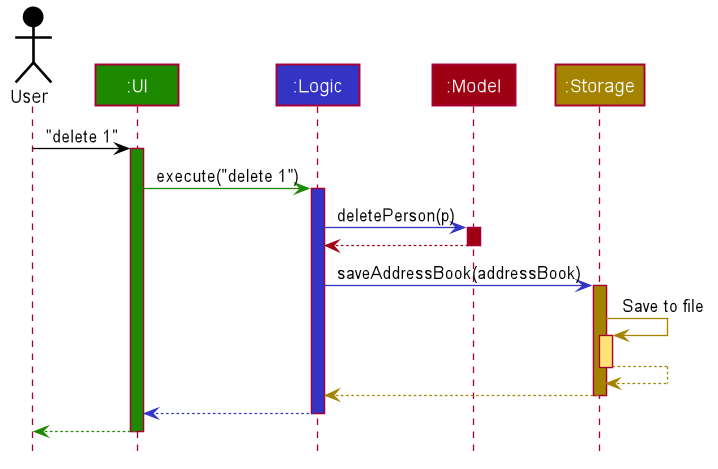
Each of the four main components (also shown in the diagram above),
- defines its API in an
interfacewith the same name as the Component. - implements its functionality using a concrete
{Component Name}Managerclass (which follows the corresponding APIinterfacementioned in the previous point.
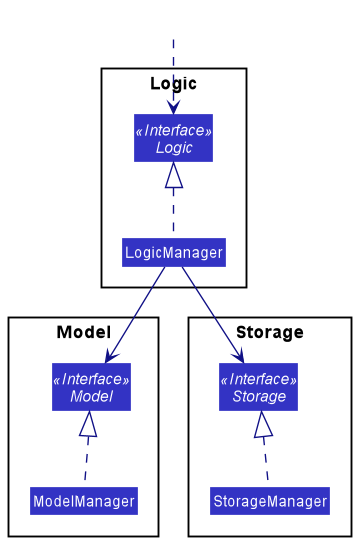
For example, the Logic component defines its API in the Logic.java interface and implements its functionality using the LogicManager.java class which follows the Logic interface. Other components interact with a given component through its interface rather than the concrete class (reason: to prevent outside component’s being coupled to the implementation of a component), as illustrated in the (partial) class diagram below.
The sections below give more details of each component.
UI component
The API of this component is specified in Ui.java
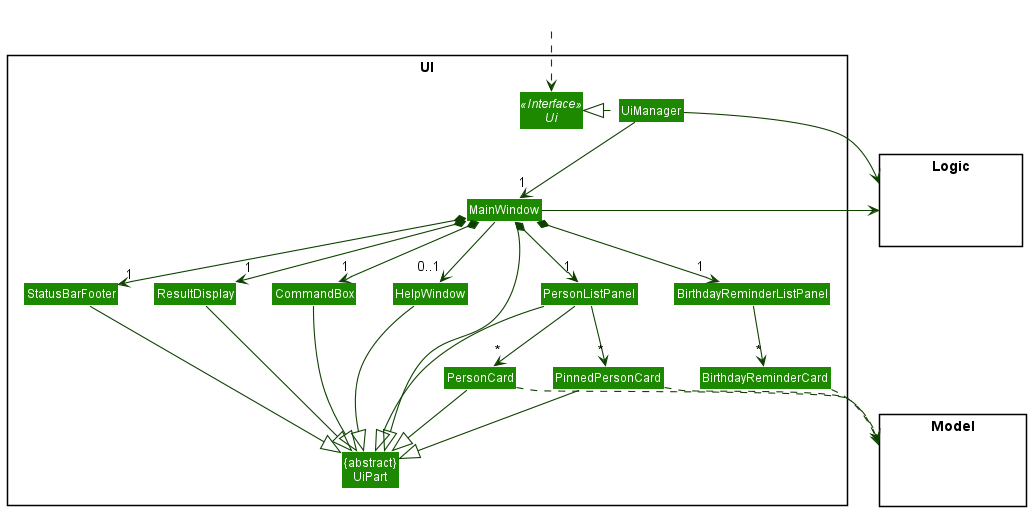
The UI consists of a MainWindow that is made up of parts e.g.CommandBox, ResultDisplay, PersonListPanel, StatusBarFooter, BirthdayReminderListPanel etc. All these, including the MainWindow, inherit from the abstract UiPart class which captures the commonalities between classes that represent parts of the visible GUI.
The UI component uses the JavaFx UI framework. The layout of these UI parts is defined in matching .fxml files that are in the src/main/resources/view folder. For example, the layout of the MainWindow is specified in MainWindow.fxml.
The UI component,
- executes user commands using the
Logiccomponent. - listens for changes to
Modeldata so that the UI can be updated with the modified data. - keeps a reference to the
Logiccomponent, because theUIrelies on theLogicto execute commands. - depends on some classes in the
Modelcomponent, as it displaysPersonobject residing in theModel.
Logic component
API : Logic.java
Here’s a (partial) class diagram of the Logic component:
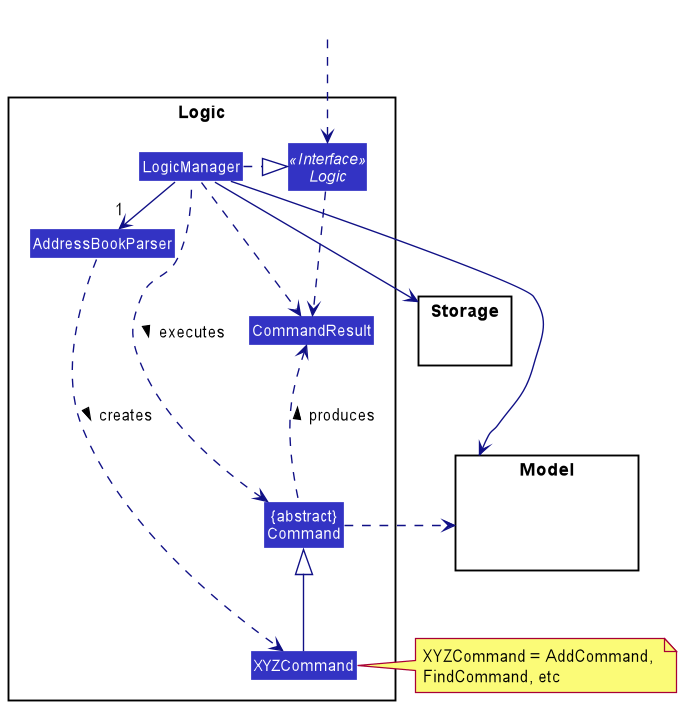
How the Logic component works:
- When
Logicis called upon to execute a command, it uses theAddressBookParserclass to parse the user command. - This results in a
Commandobject (more precisely, an object of one of its subclasses e.g.,AddCommand) which is executed by theLogicManager. - The command can communicate with the
Modelwhen it is executed (e.g. to add a contact). - The result of the command execution is encapsulated as a
CommandResultobject which is returned back fromLogic.
The Sequence Diagram below illustrates the interactions within the Logic component for the execute("delete 1") API call.
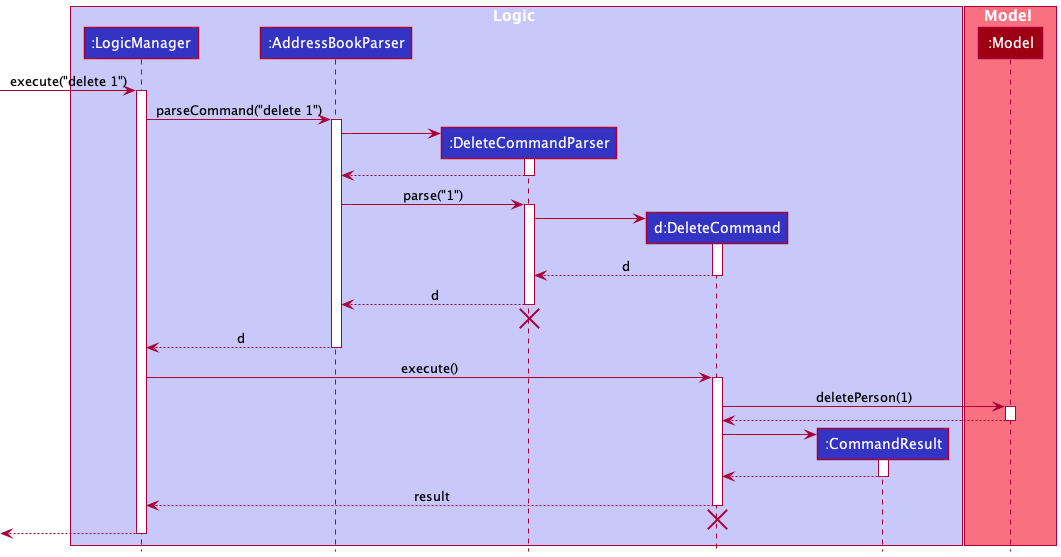
DeleteCommandParser and DeleteCommand should end at the destroy marker (X) but due to a limitation of PlantUML, the lifeline reaches the end of diagram.
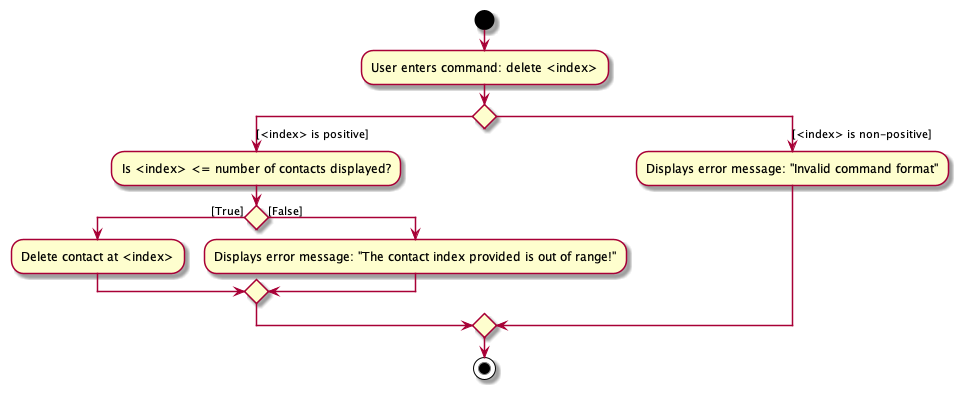
The Activity Diagram below accompanies the DeleteCommand.
Here are the other classes in Logic (omitted from the class diagram above) that are used for parsing a user command:
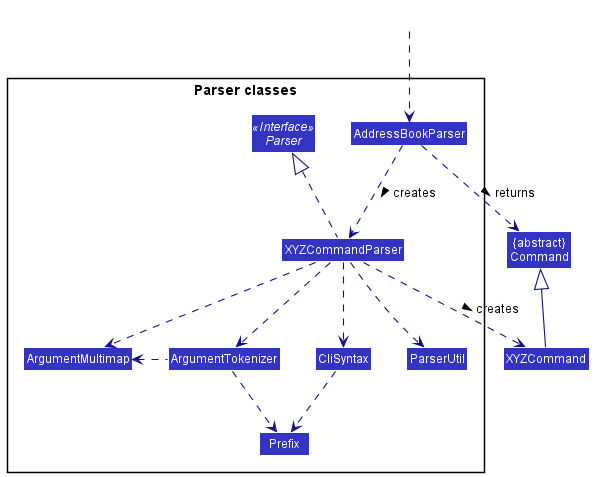
How the parsing works:
- When called upon to parse a user command, the
AddressBookParserclass creates anXYZCommandParser(XYZis a placeholder for the specific command name e.g.,AddCommandParser) which uses the other classes shown above to parse the user command and creates anXYZCommandobject (e.g.,AddCommand) which theAddressBookParserreturns back as aCommandobject. - All
XYZCommandParserclasses (e.g.,AddCommandParser,DeleteCommandParser, …) inherit from theParserinterface so that they can be treated similarly where possible e.g, during testing.
Model component
API : Model.java
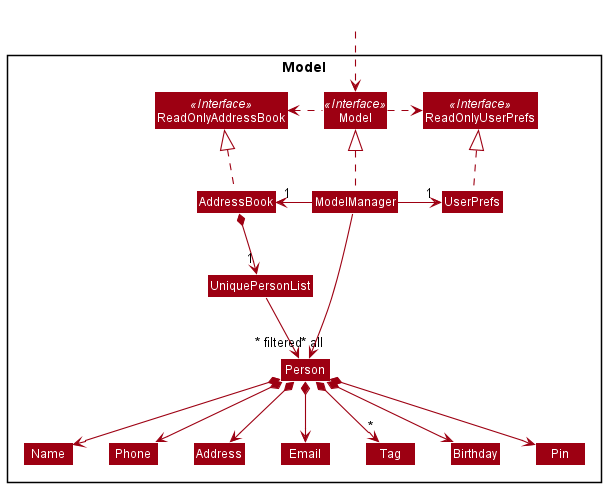
The Model component,
- stores the address book data i.e., all
Personobjects (which are contained in aUniquePersonListobject). - stores and sorts the currently ‘selected’
Personobjects (e.g., results of a search query) as a separate filtered list which is exposed to outsiders as an unmodifiableObservableList<Person>that can be ‘observed’ e.g. the UI can be bound to this list so that the UI automatically updates when the data in the list change. ThePersonobjects are sorted according to how they should be displayed. - stores and sorts the
Personobjects as a separate sorted list according to their birthday which is exposed to outsiders as an unmodifiableObservableList<Person>that can be ‘observed’ e.g. the UI can be bound to this list so that the UI automatically updates when the data in the list change. - stores a set of
Prefixobjects which is exposed to outsiders as an unmodifiableSet<Prefix>that can be ‘observed’ e.g. the UI can be bound to this set so that the UI can use this data. - stores a
UserPrefobject that represents the user’s preferences. This is exposed to the outside as aReadOnlyUserPrefobject. - does not depend on any of the other three components (as the
Modelrepresents data entities of the domain, they should make sense on their own without depending on other components).
Storage component
API : Storage.java
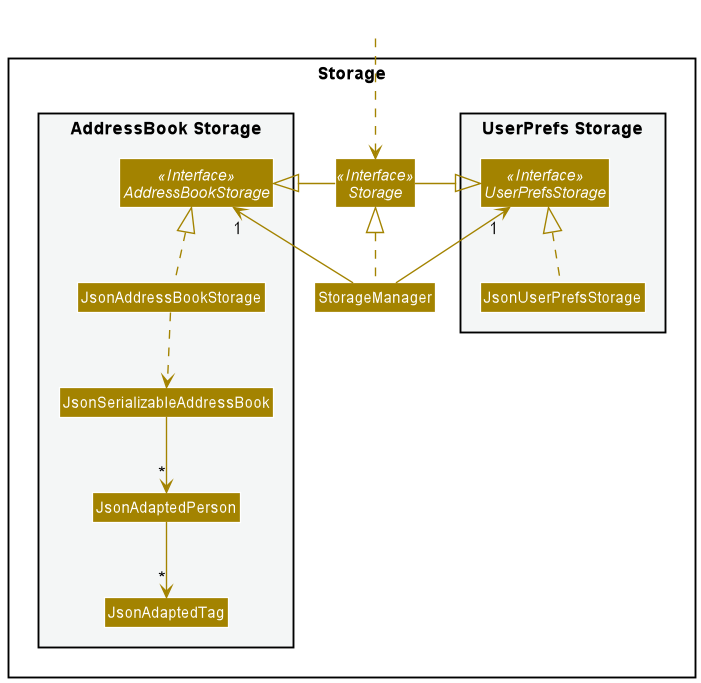
The Storage component,
- can save both address book data and user preference data in json format, and read them back into corresponding objects.
- inherits from both
AddressBookStorageandUserPrefStorage, which means it can be treated as either one (if only the functionality of only one is needed). - depends on some classes in the
Modelcomponent (because theStoragecomponent’s job is to save/retrieve objects that belong to theModel).
Common classes
Classes used by multiple components are in the seedu.addressbook.commons package.
Implementation
This section describes some noteworthy details on how certain features are implemented.
Tags
Implementation
Tags for contacts are implemented as a Tag class and are stored internally in a Set<Tag> within the Person object. Tags are parsed and created through the add, edit and tag commands, and removed through the edit and untag commands. Multiple distinct tags can also be added for each contact.
Usage
Given below is an example usage scenario and how the Tag mechanism behaves at each step.
Step 1. The user launches the application for the first time.
Step 2. The user executes the add ... t/friend command to add a contact tagged with friend into CONNECTIONS.
Step 3. CONNECTIONS displays the newly added contact with the added tag.
Step 4. The user decides to add additional tags to the contact at index 1, and executes tag 1 t/classmate.
Step 5. CONNECTIONS will update the specified contact to include the new tag classmate.
Step 6. The user decides to remove the tag student from a contact at index 3, and executes untag 3 t/student.
Step 7. CONNECTIONS updates and removes the tag student from the contact.
Design considerations:
-
Option 1 (Current choice): Tags are saved within a
Set<Tag>withinPerson- Pros: Easy to implement and doesn’t allow for duplicates.
- Cons: Searching for contacts by tags may be slow, especially if there are many contacts, with each contact having multiple tags.
-
Option 2: Utilize a separate
HashMapdata structure to map contacts to tags.- Pros: Fast retrieval of tagged contacts.
- Cons: Difficult to maintain a separate data structure.
Pin feature
Implementation
The pin mechanism is facilitated by UniquePersonList. It stores all the list of contacts in CONNECTIONS and maintains the order of these contacts according to if they are pinned or not. Pinned contacts have a higher priority and hence are displayed first. It currently implements the following operations:
-
UniquePersonList#add- adds a contact into the list of stored contacts and stores the contacts according to their priority. -
UniquePersonList#setPerson- updates an edited contact in the list of stored contacts and stores the contacts according to their priority.
The operation is exposed in the Command interface as Command#Execute, specifically in PinCommand#Execute.
Given below is an example usage scenario and how the pin mechanism behaves at each step.
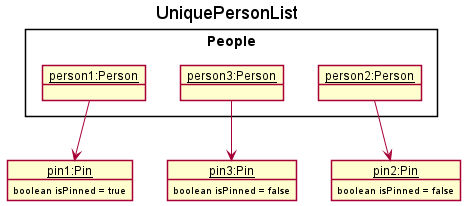
Step 1. The user launches the application. Current UniquePersonList will contain previously added contacts person1 and person2.
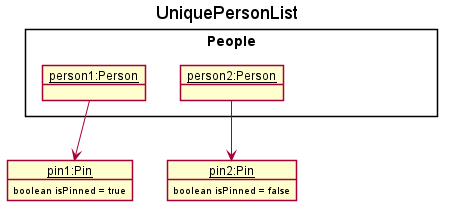
Step 2. The user executes add n/person3 … to add a new contact. This contact is initially unpinned and will be added to the UniquePersonList. It will be added to the end of the UniquePersonList.
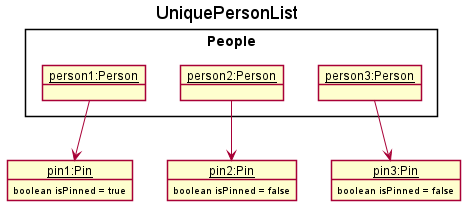
Step 3. CONNECTIONS UI displays the new contact at the end of PersonListPanel using a PersonCard.
Step 4. The user decides that person3 will be frequently contacted and should be pinned. The user executes pin 3.
Step 5. Contact’s Pin attribute will change to indicate that the contact is pinned. Contact will be brought forward in UniquePersonList, behind person1 that was already pinned.
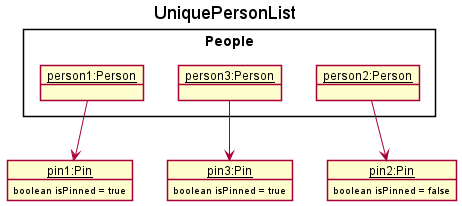
Step 6. CONNECTIONS UI will update to show the new contact at the top of the list using a PinnedPersonCard which shows a pin next to the contact’s name.
Step 7. The user decides that person3 will no longer be frequently contacted and should be unpinned. The user executes unpin 2 which unpins person3 which is second in the list.
Step 8. Contact’s Pin attribute will change to indicate that the contact is not pinned. Contact will be moved behind other pinned contacts in UniquePersonList.
Step 9. CONNECTIONS UI will update to show the contact behind other pinned contacts using a PersonCard.
The following sequence diagram shows how the pin operation works:
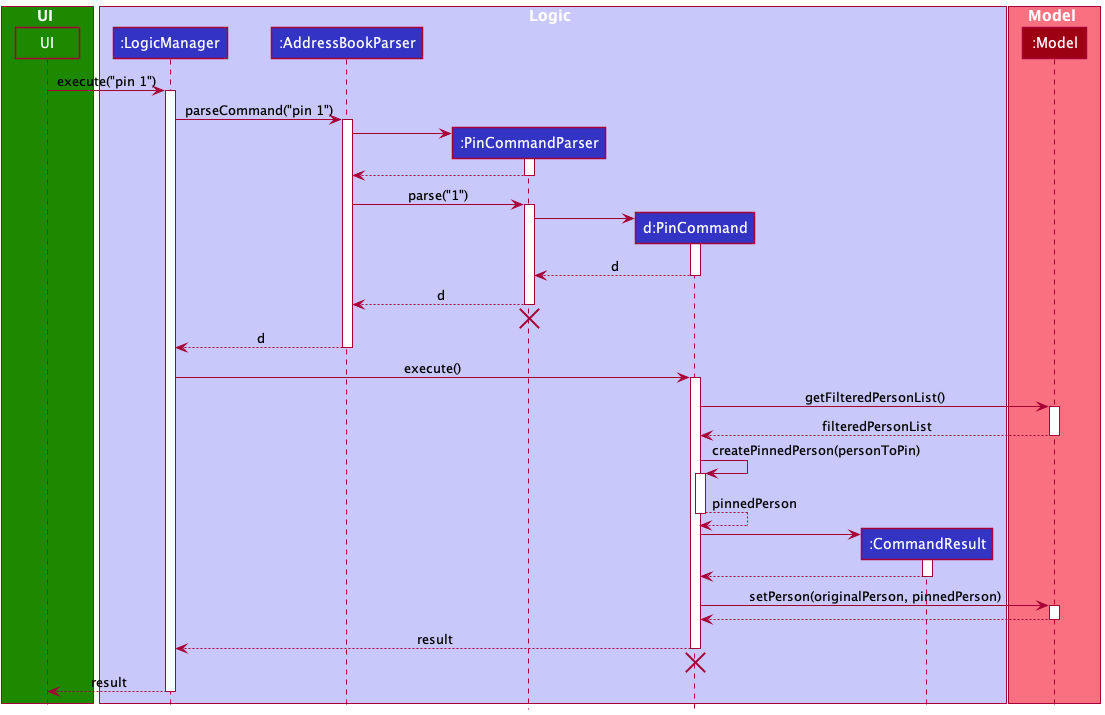
PinCommandParser and PinCommand should end at the destroy marker (X) but due to a limitation of PlantUML, the lifeline reaches the end of diagram.
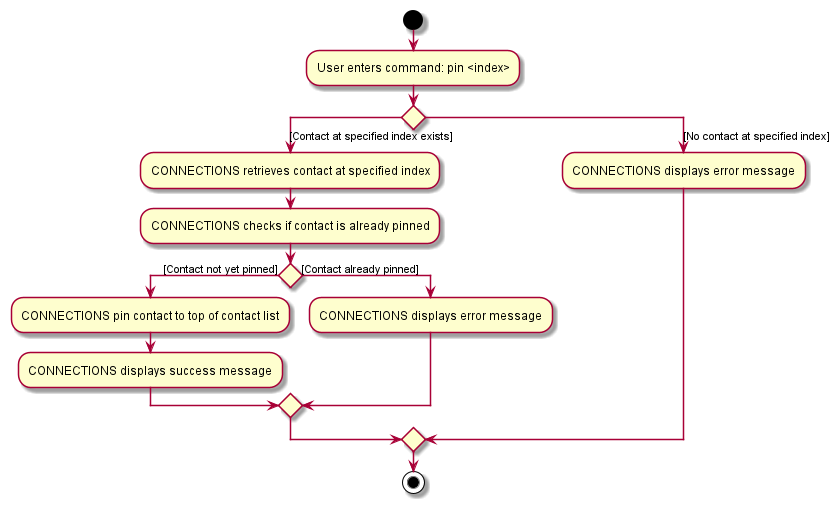
The following activity diagram shows possible user interactions with a pin command.
The following activity diagram shows possible user interactions with a unpin command.
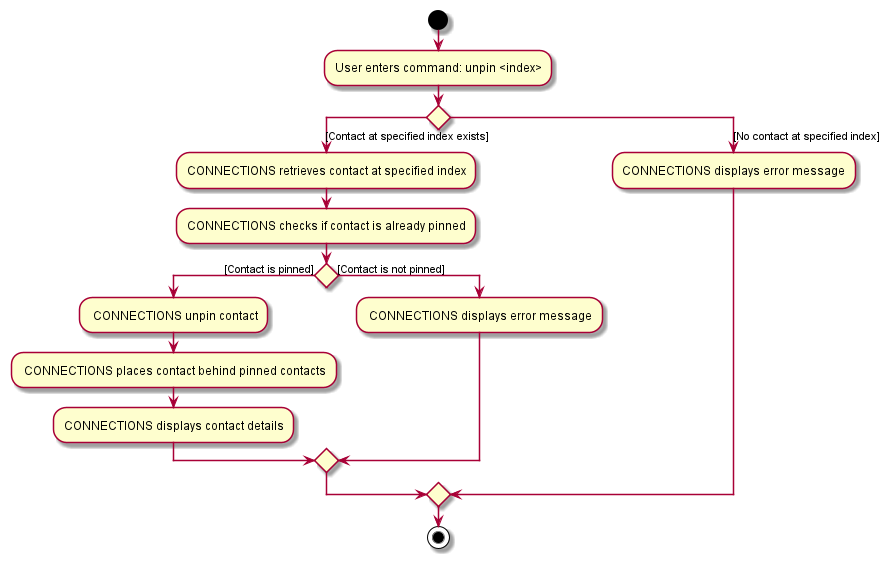
Design considerations:
Aspect: How pin executes:
-
Option 1: Contact has a boolean field isPinned to indicate if the contact is pinned or not.
- Pros: Easy to implement, less memory usage.
- Cons: Less flexibility in expanding the usage of pin.
-
Option 2 (current choice): Contact has Pin object to indicate if the contact is pinned or not.
- Pros: More flexible to expand, other methods can be added to Pin if needed.
- Cons: Will use more memory.
Aspect: How each pinned contact is displayed:
-
Option 1 (current choice): Have two separate cards,
PersonCardandPinnedPersonCard, for a unpinned contact and pinned contact respectively.- Pros: Easier to implement.
- Cons: More code duplication.
-
Option 2: Have one card that will add a pin if the contact is pinned.
- Pros: Harder to implement.
- Cons: Less code duplication.
Find feature
Implementation
The operation is exposed in the Command interface as Command#Execute, specifically in FindCommand#Execute.
The filtered list will be updated using ModelManager#updateFilteredPersonList. A FindPredicate is generated according to the user’s command and passed as an argument into ModelManager#updateFilteredPersonList.
It will be displayed in PersonListPanel.
Given below is an example usage scenario and how the Find mechanism behaves at each step.
Step 1. The user launches the application for the first time. All contacts are displayed by default.
Step 2. The user executes find n/David t/friend t/football to search for a matching contact.
Step 3. A FindPredicate which will only return true if contact’s name contains David while also having friend and
football tagged to them is made.
Step 4. ThisFindPredicate is passed into ModelManager#updateFilteredPersonList, updating the filtered list.
Step 5. CONNECTIONS’ UI observes the filtered list and displays the updated filtered list in PersonListPanel. Only contacts whose name contains David while also having friend and
football tagged to them will be displayed.
The following sequence diagram shows how the Find operation works:
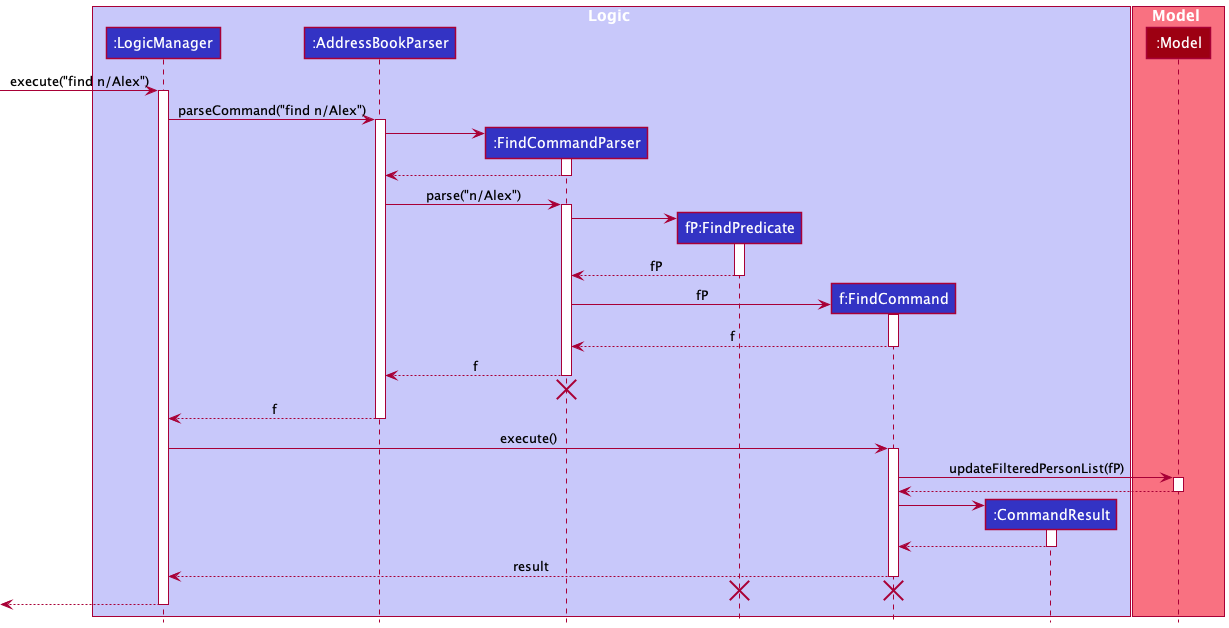
FindCommandParser, FindPredicate and FindCommand should end at the destroy marker (X) but due to a limitation of PlantUML, the lifeline reaches the end of diagram.
Design considerations:
Aspect: How Find executes:
-
Option 1: Utilize two predicates, one to check if contact’s Name contains the keywords and one to check if contact’s Tag(s) contains the keywords.
- Pros: Straightforward.
- Cons: Introduces additional and unnecessary complexities to ModelManager.
-
Option 2 (current choice): Create a
FindPredicateto store Name and Tag(s)- Pros: Cleaner implementation. Only need to modify a method to modify the functionality of
FindCommand. - Cons: More code.
- Pros: Cleaner implementation. Only need to modify a method to modify the functionality of
FindAny feature
Implementation
The operation is exposed in the Command interface as Command#Execute, specifically in FindAnyCommand#Execute.
The filtered list will be updated using ModelManager#updateFilteredPersonList. A FindAnyPredicate is generated according to the user’s command and passed as an argument into ModelManager#updateFilteredPersonList.
It will be displayed in PersonListPanel.
Given below is an example usage scenario and how the FindAny mechanism behaves at each step.
Step 1. The user launches the application for the first time. All contacts are displayed by default.
Step 2. The user executes findAny n/David n/Henry t/friend t/football to search for a matching contact.
Step 3. A FindAnyPredicate which will only return true if contact’s name contains either David or Henry OR are
tagged to either friend or football is made.
Step 4. ThisFindAnyPredicate is passed into ModelManager#updateFilteredPersonList, updating the filtered list.
Step 5. CONNECTIONS’ UI observes the filtered list is updated and displayed the updated filtered list in PersonListPanel.
The following sequence diagram shows how the FindAny operation works:
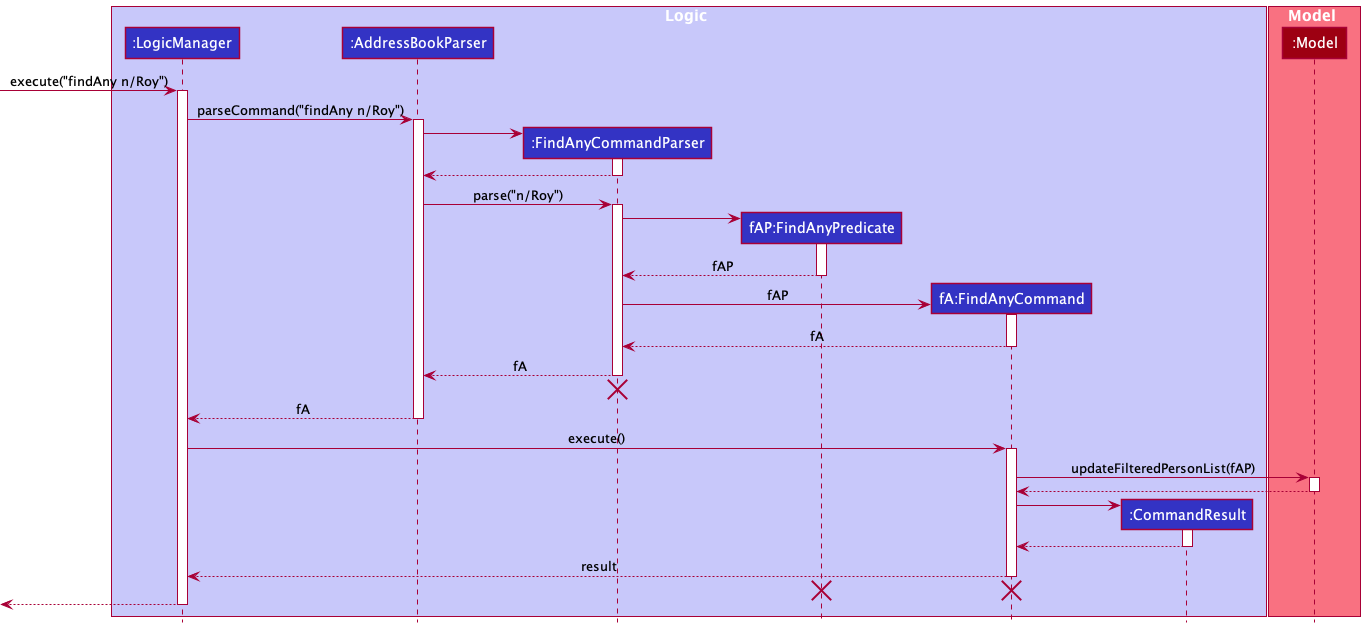
FindAnyCommandParser, FindAnyPredicate and FindAnyCommand should end at the destroy marker (X) but due to a limitation of PlantUML, the lifeline reaches the end of diagram.
Design considerations:
Aspect: How FindAny executes:
-
Option 1: Utilize two predicates, one to check if contact’s Name contains the keywords and one to check if contact’s Tag(s) contains the keywords.
- Pros: Straightforward.
- Cons: Introduces additional and unnecessary complexities to ModelManager.
-
Option 2 (current choice): Create a
FindAnyPredicateto store Name and Tag(s).- Pros: Cleaner implementation. Only need to modify a method to modify the functionality of
FindAnyCommand. - Cons: More code.
- Pros: Cleaner implementation. Only need to modify a method to modify the functionality of
Help feature
Implementation
The operation is exposed in the Command interface as Command#Execute, specifically in HelpCommand#Execute.
Help messages will be displayed in the CONNECTIONS’ UI through the ResultDisplay.
Given below is an example usage scenario and how the Help mechanism behaves at each step.
Step 1. The user launches the application for the first time.
Step 2. The user executes help to seek help on CONNECTION’s usage.
Step 3. CONNECTIONS displays a list of available commands in ResultDisplay.
Step 4. The user decides to view the usage of add to learn to add a contact, and executes help add.
Step 5. CONNECTIONS will display a detailed help message on the usage of the add command in ResultDisplay.
The following sequence diagram shows how the Help operation works:
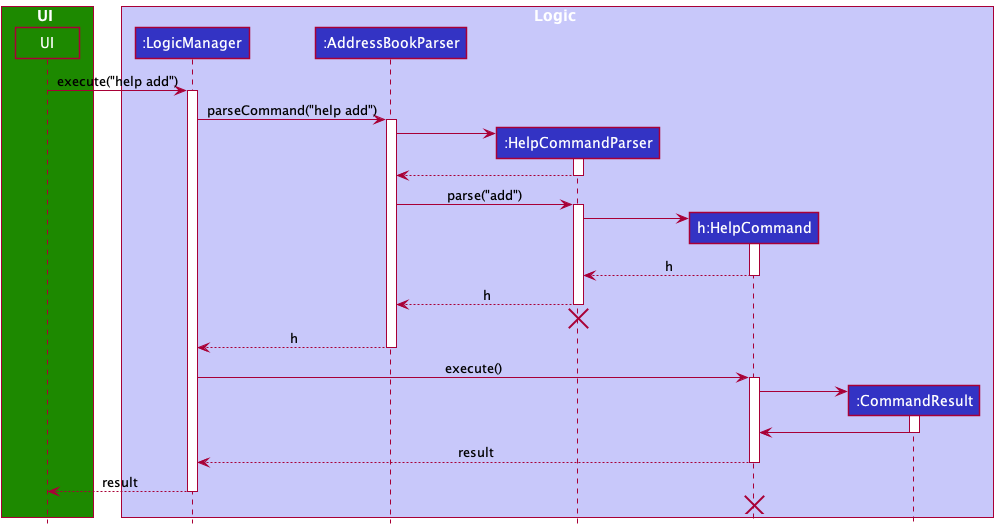
HelpCommandParser and HelpCommand should end at the destroy marker (X) but due to a limitation of PlantUML, the lifeline reaches the end of diagram.
Birthday Reminder feature
Implementation
Shows a list of contacts with upcoming birthdays. This list of birthday reminders is displayed to the user through the UI, specifically in BirthdayReminderListPanel. Each birthday is displayed as a BirthdayReminderCard.
The list of birthdays is generated in the ModelManager, which implements the following functions:
-
ModelManager#getBirthdayReminderListreturns anObservableList<Person> birthdayRemindersthat is ordered according to upcoming birthdays.
Given below is an example usage scenario and how the birthday reminders mechanism behaves at each step.
Step 1. On app startup, contacts with a birthday are sorted by birth month and day. Contacts with birthdays that fall on the present day are colored green while birthdays that are within one week are colored blue. Additionally, a customized message with each contact’s phone number and age will be displayed in the birthday reminder list.
Step 2. The BirthdayReminderListPanel in CONNECTIONS’ UI displays birthday reminders in sorted order, starting with the earliest upcoming birthday to the latest upcoming birthday for the year, after which displays birthdays that have passed for the current year in sorted order.
Step 3. The user executes add n/person3 b/01012000 … to add a new contact.
Step 4. CONNECTIONS will store the new contact. The ObservableList<Person> birthdayReminders for BirthdayReminderPanelList will be updated to include the new contact, ensuring the birthday reminder list remains sorted as shown below.
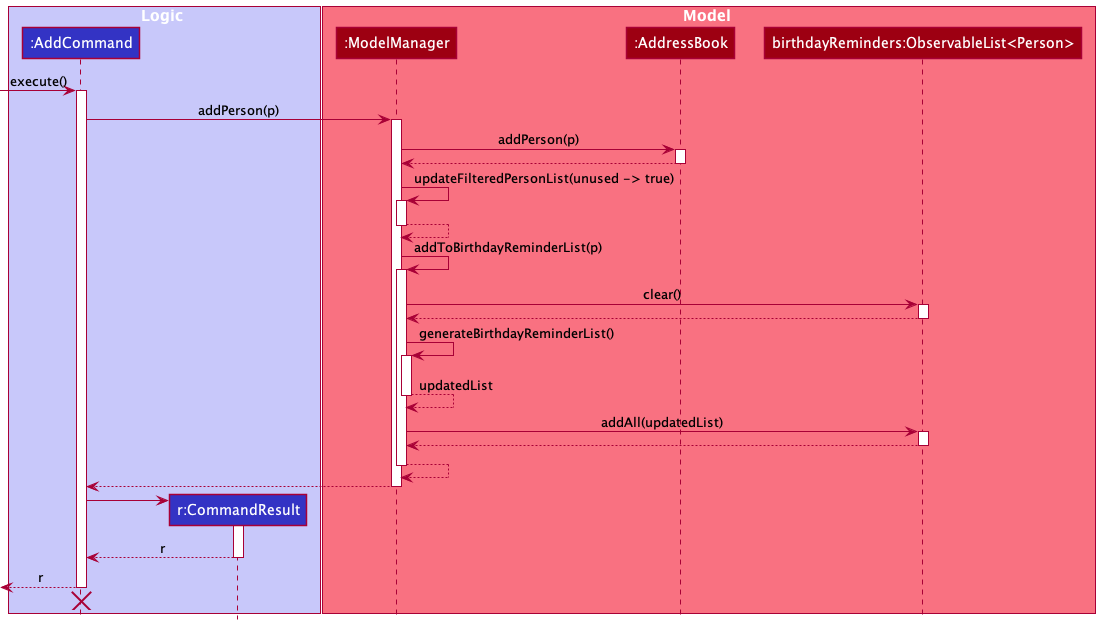
AddCommand should end at the destroy marker (X) but due to a limitation of PlantUML, the lifeline reaches the end of diagram.
Step 5. CONNECTIONS UI will observe for changes in the ObservableList<Person> birthdayReminders and update BirthdayReminderPanelList, displaying the new contact.
Design considerations:
Aspect: How will the ObservableList<Person> birthdayReminders update with a new contact:
-
Option 1 (current choice): Clear the birthday reminders and regenerate them.
- Pros: Straightforward.
- Cons: It will be slower as the whole list is regenerated.
-
Option 2: Insert the contact into the list.
- Pros: Faster than the alternative.
- Cons: Harder to implement and maintain.
Mailing List feature
Allows users to download a CSV file mailing list of the current view.
Users can use arguments to specify which fields to include in their download.
Implementation
Given below is an example usage scenario and how the Mailing List mechanism behaves at each step.
Step 1. The user filters the contacts using other commands, eg. find.
Step 2. The FilteredList in Model is updated.
Step 3. The UI is updated to reflect this new state.
Step 4. The user provides a series of prefixes to mailingList to pick the fields. If no arguments are provided, default selectors are used.
Step 5. These Prefix arguments are stored in Model.
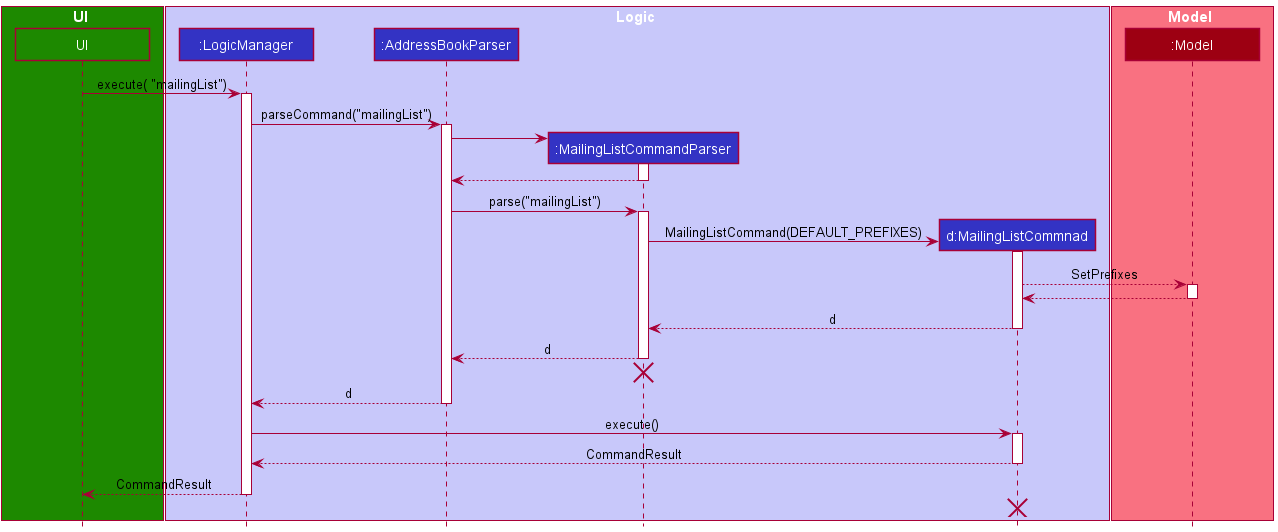
MailingListCommandParser and MailingListCommand should end at the destroy marker (X) but due to a limitation of PlantUML, the lifeline reaches the end of diagram.
Step 6. The user is prompted to pick a name and the download location for their generated CSV file.
Step 7. The FilteredList, Prefixes and Path are passed to CsvUtil#modelToCsv, which will serialize and write the CSV file.
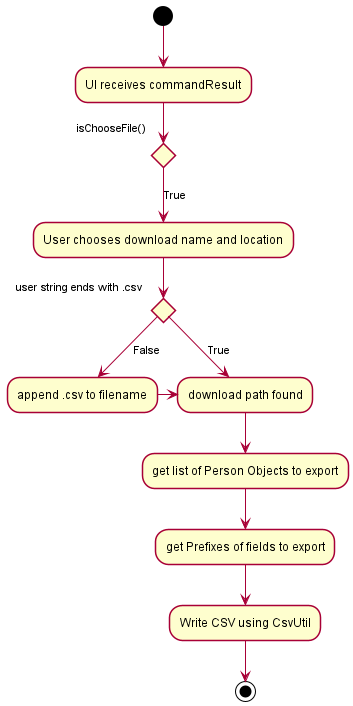
Step 8. The header row is created based on Prefix arguments stored in Model, based on a mapping in CsvUtil.
Step 9. Individual rows are generated based on the Prefix arguments stored in Model and the FilteredPerson in ModelManager, based on a mapping in CsvUtil.
Step 10. The headers and rows are written to the CSV file that is specified by the user.
Front end design considerations:
- Arguments for the command should follow the standard used in other parts of the software.
- Balancing between simplicity of use when no arguments are provided, and flexibility for users who might want additional information.
Back end design considerations:
-
Option 1: Store serialized CSV data in CommandResult and pass it directly to CsvUtil
- Pros: Straightforward.
- Cons: Requires large changes to the attributes and purpose of CommandResult.
-
Option 2 (current choice): Store data in model and access using logic
- Pros: Minimal changes to CommandResult structure are necessary.
- Cons: Additional calls to logic and model are needed to get the required information.
Command History feature
Implementation
The operation is exposed in CommandBox and CommandHistory.
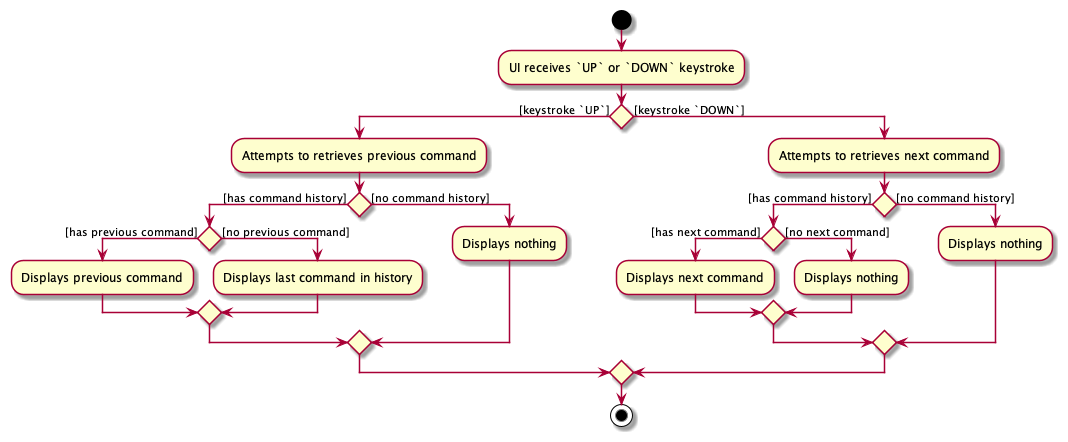
The user keystroke will be read in CommandBox#handleKeyStroke, which will call the appropriate method in CommandHistory to retrieve the previous and next commands. The retrieved commands are passed into CommandBox#commandTextField to be displayed.
Given below is an example usage scenario and how the Command History mechanism behaves at each step.
Step 1. The user launches the application for the first time. All contacts are displayed by default.
Step 2. The user executes find n/David t/friend t/football to search for a matching contact.
Step 3. User wants to retrieve previous command and presses the UP key.
Step 4. CommandBox#handleKeyStroke reads the UP keystroke and calls CommandHistory#getPreviousCommand.
Step 5. CommandHistory retrieves the previous command and returns it.
Step 6. CommandBox displays the previous command in the Command Box.
The following activity diagram shows possible user interactions with the command history feature.
Design considerations:
Aspect: Implementation of Command History:
-
Option 1 (current choice): Generate
CommandHistoryas a Singleton class.- Pros: Ensures that there is only one set of history that is tracked.
- Cons: Complicates testing as different versions of history cannot be created.
-
Option 2: Generate
CommandHistoryas a normal class.- Pros: Makes testing easier as multiple
CommandHistoryobjects can be created with different history to test different conditions. - Cons: Possible conflicting history if
CommandHistoryis not updated properly.
- Pros: Makes testing easier as multiple
Command Assistant feature
Implementation
The operation is exposed in SystemCommand, specifically in SystemCommand#execute.
The user keystroke will be read in CommandBox#handleKeyStroke. The user input will be evaluated by SystemCommand#execute to determine the appropriate help message to display.
Given below is an example usage scenario and how the Command Assistant mechanism behaves at each step.
Step 1. The user launches the application for the first time. All contacts are displayed by default.
Step 2. The user enters find to search for a matching contact.
Step 3. CommandBox#handleKeyStroke reads find input string and calls SystemCommand#execute.
Step 4. SystemCommand evaluates the user input and returns the appropriate help message.
Step 5. CONNECTIONS will display a help message in ResultDisplay.
Design considerations:
Aspect: Implementation of Command Assistant:
-
Option 1: Create a
AssistantCommandclass which extends fromCommandto handle the features ofCommand Assistant.- Pros: Simplifies implementation as only an additional subclass needs to be created.
- Cons: Creates an additional command that users may be able to utilise, which they are not supposed to.
-
Option 2 (current choice): Create a new type of command called
SystemCommandthat does not extend fromCommand.- Pros: Prevents potential issues such as users using an additional command which they are not supposed to use.
- Cons: Requires additional code to interface with
Logic,MainWindowandCommandBox.
[Proposed] Partial data recovery feature
Allows the user to recover partial data if the data file becomes corrupted.
Proposed Implementation
Currently, if the data file is corrupted, CONNECTIONS will use an empty data file upon start up.
The proposed implementation can be facilitated by JsonAdaptedPerson and JsonAddressBookStorage. Upon getting an invalid data format for compulsory fields, JsonAdaptedPerson can return null and
not be added to JsonAddressBookStorage. If optional fields are corrupt, default values can be used. This allows other contacts and the other fields of the corrupt contact to be recovered.
Given below is an example usage scenario and how the Help mechanism behaves at each step.
Step 1. The user edits the data file and changes the Tag field of the first contact to an invalid value.
Step 2. The user edits the data file and changes the Email field of the second contact to an invalid value.
Step 3. Upon start up, JsonAddressBookStorage attempts to load the data file. Since the value of Tag (optional field) for the first contact is invalid, JsonAdaptedPerson will not add the invalid Tag.
Step 4. Since the value of Email (compulsory field) for the second contact is invalid, JsonAdaptedPerson returns null which is not added to JsonAddressBookStorage.
Step 3. CONNECTIONS will not display the first contact’s invalid Tag and will not display the second contact. The other fields and contacts will be displayed as per normal.
Documentation, logging, testing, configuration, dev-ops
Appendix: Requirements
Product scope
Target user profile:
- has a need to manage a significant number of contacts
- sociable and has multiple different friend groups that can partially overlap
- regularly organizes birthday parties for these contacts
- regularly invites other contacts to these parties
- is forgetful
- needs to keep track of different groups who are invited to different parties
- prefer desktop apps over other types
- can type fast
- prefers typing to mouse interactions
- is reasonably comfortable using CLI apps
Value proposition:
- retrieve contact details of all members of a group quickly and easily
- view contact details of frequently contacted contacts easily
- keep track of upcoming birthdays
- easy to use
User stories
| As a… | I want to… | So that I can… |
|---|---|---|
| Person who loves birthdays | Track birthdays | Easily check the birthday of friends |
| Person who loves birthdays and is forgetful | Have birthday reminders | Avoid missing any of my friends’ birthdays |
| Party Organizer | Look for contact details for all my friends | Send out invites |
| Party Organizer | Generate csv file of my invitees | Take attendance or make external notes |
| Party Organizer | Tag contacts with a party | Easily keep track of those coming for parties |
| Party Organizer | Untag contacts from a party | Easily remove those who are not coming for parties |
| Party Organizer | Search contacts by party | Generate invite list |
| Party Organizer | Search contacts by parties | View who is coming for these parties |
| Party Organizer | Delete multiple contacts at once | Quickly delete contacts that I no longer need |
| Sociable person | Pin frequent contacts | Easily access contacts that I contact often |
| Sociable person | Save up to 100 contacts | Keep all my friends’ contacts |
| Sociable person | Search for contacts within a reasonable timing | Avoid waiting too long for search results |
| Beginner | See sample commands | See what I should be typing |
| Beginner | View helpful prompts | See what can be done with the app |
| Beginner | View feedback on wrong commands | Format commands better |
| Beginner | Get help on specific commands | Learn how to use the app |
| Fast typer | Use sentences to interact with the app | Utilize the functions of the app quicker without using a mouse |
| User | Can modify contact details | Update my contacts’ details |
| Experienced user | Retrieve previously run commands | Avoid typing the commands I use frequently again and again |
Use cases
Use case: Add a contact
MSS
- User chooses to add a contact.
- User provides the contact’s details.
-
CONNECTIONS creates a contact entry for that contact’s details
Use case ends.
Extensions
-
2a. User provides incomplete details.
-
2a1. CONNECTIONS shows an error message.
Use case resumes at step 2.
-
-
2b. User provides details identical to an existing contact in CONNECTIONS.
-
2b1. CONNECTIONS informs user that this is a duplicate.
Use case resumes at Step 1.
-
Use case: Clear all contacts
MSS
- User requests to clear all contacts.
-
CONNECTIONS deletes all contacts.
Use case ends.
Use case: Delete a contact
MSS
- User requests to list contacts.
- CONNECTIONS shows a list of contacts.
- User requests to delete a specific contact in the list.
-
CONNECTIONS deletes the contact.
Use case ends.
Extensions
-
2a. The list is empty.
Use case ends.
-
3a. The given index is invalid.
-
3a1. CONNECTIONS shows an error message.
Use case resumes at step 2.
-
Use case: Edit a contact’s details
MSS
- User requests to list contacts.
- CONNECTIONS shows a list of contacts.
- User provides his/her index of the contact that is to be edited in the list, along with the replacement information.
-
CONNECTIONS reflects the edits that were made.
Use case ends.
Extensions
-
2a. The list is empty.
Use case ends.
-
3a. The given index is invalid.
-
3a1. CONNECTIONS shows an error message.
Use case resumes at step 2.
-
Use case: Exit the program
MSS
- User requests to exit
-
CONNECTIONS exit
Use case ends.
Use case: Find a contact
MSS
- User chooses to look for a contact.
- Use provides the search term.
-
CONNECTIONS returns all contacts that match all search terms provided.
Use case ends.
Extensions
-
2a. CONNECTIONS is empty.
-
2a1. CONNECTIONS displays a message to indicate no contacts.
Use case ends.
-
-
2b. No existing contact match the search term provided.
-
2b1. CONNECTIONS displays a message to indicate no matching contacts.
Use case resumes at step 2.
-
-
2c. User requests for
orsearch (at least one search term is matches).-
2c1. CONNECTIONS returns all contacts that match any of the search terms provided.
Use case ends.
-
Use case: Find contacts via Tags
MSS
- User chooses to look for a contact.
- User provides the tag.
-
CONNECTIONS returns all contacts that match the tag.
Use case ends.
Extensions
-
2a. CONNECTIONS is empty.
-
2a1. CONNECTIONS displays a message to indicate no contacts.
Use case ends.
-
-
2b. No existing contacts match the tag provided.
-
2b1. CONNECTIONS displays a message to indicate no matching contacts.
Use case resumes at step 2.
-
Use case: Pin a contact
MSS
- User provides the index of contact to pin.
-
CONNECTIONS pins the contact to the top of the displayed list.
Use case ends.
Extensions
-
1a. Index provided is invalid.
-
1a1. CONNECTIONS displays a message to indicate the index is invalid.
Use case ends.
-
-
1b. Contact at index is already pinned.
-
1b1. CONNECTIONS displays a message to indicate contact is already pinned.
Use case ends.
-
Use case: Unpin a contact
MSS
- User provides the index of contact to unpin.
-
CONNECTIONS unpins the contact.
Use case ends.
Extensions
-
1a. Index provided is invalid.
-
1a1. CONNECTIONS displays a message to indicate that the index is invalid.
Use case ends.
-
-
1b. Contact at index is not pinned.
-
1b1. CONNECTIONS displays a message to indicate contact is not pinned.
Use case ends.
-
Use case: List everyone in the address book
MSS
- User requests to list all contacts.
-
CONNECTIONS displays all contacts.
Use case ends.
Extensions
-
2a. CONNECTIONS is empty.
Use case ends.
Use case: Tag a contact
MSS
- User requests to list contacts.
- CONNECTIONS shows a list of contacts.
- User provides his index in the list along with the tags to be added.
-
CONNECTIONS adds those tags to that contact.
Use case ends.
Extensions
-
2a. CONNECTIONS is empty
Use case ends.
-
3a. Index provided is out of range.
-
3a1. CONNECTIONS displays an error message.
Use case resumes at step 2.
-
-
3b. Target contact already has the tag specified.
-
3b1. CONNECTIONS displays an error message.
Use case resumes at step 2.
-
Use case: Untag a contact
MSS
- User requests to list contacts.
- CONNECTIONS shows a list of contacts.
- User provides his index in the list along with the tags to be removed.
-
CONNECTIONS remove those tags from that contact.
Use case ends.
Extensions
-
2a. CONNECTIONS is empty.
Use case ends.
-
3a. Index provided is out of range.
-
3a1. CONNECTIONS displays an error message.
Use case resumes at step 2.
-
-
3b. Target contact do not have the tag specified.
-
3b1. CONNECTIONS displays an error message.
Use case resumes at step 2.
-
Use case: Getting help
MSS
- User requests to show help for a command.
-
CONNECTIONS shows the guide on how to use the command.
Use case ends.
Extensions
- 1a. Keyword
morewas provided.-
1a1. CONNECTIONS shows a pop-up with a link to the UserGuide.
Use case ends.
-
- 1b. Command was not provided.
-
1b1. CONNECTIONS shows all available commands.
Use case ends.
-
- 1c. Command provided is invalid.
-
1c1. CONNECTIONS displays an error message followed by a list of valid commands.
Use case ends.
-
Use case: Generate CSV file
MSS
- User requests to generate a CSV file containing selected data fields of the contacts displayed.
- CONNECTIONS requests for the user to input export location and file name.
- User selects an export location and file name.
-
CONNECTIONS generates a CSV file in the export location with the specified file name.
Use case ends.
Extensions
- 1a. User inputs invalid fields.
-
1a1. CONNECTIONS displays an error message.
Use case ends.
-
- 2a. User fails to choose an export location.
-
2a1. CONNECTIONS does not export the CSV file.
Use case ends.
-
Use case: Deleting multiple contacts
MSS
- User requests to delete multiple contacts.
-
CONNECTIONS deletes the contacts.
Use case ends.
Extensions
- 1a. User inputs indexes that are out of range.
-
1a1. CONNECTIONS displays an error message.
Use case ends.
-
- 1b. User inputs negative numbers.
-
1b1. CONNECTIONS displays an error message.
Use case ends.
-
- 1c. User inputs start index that is bigger then end index.
-
1c1. CONNECTIONS displays an error message.
Use case ends.
-
Use case: View prompts for commands
MSS
- User starts typing a command.
-
CONNECTIONS displays a prompt to help the user write the command.
Use case ends.
Extensions
- 1a. User is not writing a valid command.
-
1a1. CONNECTIONS will not display a prompt.
Use case ends.
-
Use case: View previous command history
MSS
- User requests to view previous commands.
-
CONNECTIONS displays previous commands.
Use case ends.
Extensions
- 1a. There is no previous command history.
-
1a1. CONNECTIONS will not display any commands.
Use case ends.
-
Non-Functional Requirements
- Should work on any mainstream OS as long as it has Java
11or above installed. - Should be able to hold up to 100 contacts without a noticeable sluggishness in performance for typical usage.
- A user with above-average typing speed for regular English text (i.e. not code, not system admin commands) should be able to accomplish most of the tasks faster using commands than using the mouse.
Glossary
- CONNECTIONS: The name of our product
- Contact: An item written or printed in a diary, list, account book, or reference book.
- Mainstream OS: Windows, Linux, Unix, macOS
- Search Term: A search term is what users key in when they want to find something specific
- Tag: A label attached to someone or something for the purpose of identification or to give other information.
Appendix: Instructions for manual testing
Given below are instructions to test the app manually.
Launch and shutdown
-
Initial launch
-
Download the jar file and copy it into an empty folder.
-
Launch the jar file using the
java -jar CONNECTIONS.jarin powershell for Windows users and terminal for macOS and Linux users. Double-click the jar file as last resort.
Expected: Shows the GUI with a set of sample contacts. The birthday reminder list shows a birthday reminder message for each contact with a non-empty birthday field. The window size may not be optimum.
-
-
Saving window preferences
-
Resize the window to an optimum size. Move the window to a different location. Close the window.
-
Re-launch the app by double-clicking the jar file.
Expected: The most recent window size and location is retained.
-
Adding a contact
-
Adding a contact with all fields
-
Prerequisites: No existing contact with phone number 98989898 and existing contact with phone number 32323232.
-
Test case:
add n/James p/98989898 e/james@gmail.com a/311, Clementi Ave 2, #02-25 t/friends t/owesMoney b/04071999
Expected: Contact with correct details added to contact list. Contact’s birthday added to birthday reminder list in correct position. Details of the added contact are shown in the status message. -
Test case:
add n/James p/32323232 e/james@gmail.com a/311, Clementi Ave 2, #02-25 t/friends t/owesMoney b/04071999
Expected: No contact is added due to duplicated phone number. Error details are shown in the status message. -
Other incorrect add commands to try:
add <other valid params> b/<future date>,add <other valid params> p/hp:1200123,....
Expected: No contact is added. Error details are shown in the status message.
-
-
Adding a contact without optional fields
-
Prerequisites: No existing contact with phone number 98989898.
-
Test Case:
add n/James p/98989898 e/james@gmail.com a/311, Clementi Ave 2, #02-25
Expected: Contact with correct details added to contact list. Birthday reminder list unchanged. Details of the added contact are shown in the status message. -
Test case:
add n/James p/98989898 e/jamesgmail.com a/311, Clementi Ave 2, #02-25
Expected: No contact is added due to invalid email format. Error details are shown in the status message. -
Other incorrect add commands to try:
add n/James! <other valid params>,add <one invalid param amongst other valid params>,....
Expected: No contact is added. Error details are shown in the status message.
-
Finding a contact (all search terms must be fulfilled)
-
Finding a contact by name
-
Prerequisites: Multiple contacts in the list with at least one contact named Roy. No contact has the name George (case-insensitive).
-
Test case:
find n/Roy
Expected: Displays contacts with name Roy. Number of contacts found shown in the status message. -
Test case:
find n/George
Expected: 0 contacts displayed. Status message indicates 0 contacts are found. -
Test case:
find n/roy!
Expected: No changes made. Error details are shown in the status message. -
Other incorrect untag commands to try:
find,find n/,....
Expected: No changes made. Error details are shown in the status message.
-
- Finding a contact by tag
-
Prerequisites: Multiple contacts in the list with one contact having tag colleagues and one with tag Colleagues. No contact has the tag owesMoney (case-insensitive).
-
Test case:
find t/Colleagues
Expected: Displays contacts with tag colleagues. Number of contacts found shown in the status message. -
Test case:
find c/ t/Colleagues
Expected: Displays contacts with tag Colleagues (case-sensitive). Number of contacts found shown in the status message. -
Test case:
find t/owesMoney
Expected: 0 contacts displayed. Status message indicates 0 contacts are found. -
Test case:
find t/123!
Expected: No changes made. Error details are shown in the status message. -
Other incorrect untag commands to try:
find,find t/Colleagues c/,....
Expected: No changes made. Error details are shown in the status message.
-
- Find a contact by tag and name
-
Prerequisites: Multiple contacts in the list with one contact with name Roy having tag name colleagues and one with name Adam having tag name Colleagues.
-
Test case:
find n/Roy t/Colleagues
Expected: Displays contacts with tag colleagues and whose name contains Roy. Number of contacts found shown in the status message. Roy is within the list but Adam is not. -
Test case:
find c/ n/Roy t/Colleagues
Expected: Displays contacts with tag Colleagues (case-sensitive) and whose name contains Roy. Number of contacts found shown in the status message. Neither Roy nor Adam is within the list. -
Test case:
find n/Roy t/123!
Expected: No changes made. Error details are shown in the status message. -
Other incorrect untag commands to try:
find,find t/<valid tag> n<valid name> c/,....
Expected: No changes made. Error details are shown in the status message.
-
Find a contact (at least one search term must be fulfilled)
-
Find a contact by name
-
Prerequisites: Multiple contacts in the list with at least one contact named Roy. None of the contacts has the name George (case-insensitive).
-
Test case:
findAny n/Roy
Expected: Displays contacts with name Roy. Number of contacts found shown in the status message. -
Test case:
findAny n/George
Expected: 0 contacts displayed. Status message indicates 0 contacts are found. -
Test case:
findAny n/roy!
Expected: No changes made. Error details are shown in the status message. -
Other incorrect untag commands to try:
findAny,findAny n/,....
Expected: No changes made. Error details are shown in the status message.
-
- Find a contact by tag
-
Prerequisites: Multiple contacts in the list with one contact having tag name colleagues and one with tag name Colleagues. None of the contacts has the tag owesMoney (case-insensitive).
-
Test case:
findAny t/Colleagues
Expected: Displays contacts with tag colleagues. Number of contacts found shown in the status message. -
Test case:
findAny c/ t/Colleagues
Expected: Displays contacts with tag Colleagues (case-sensitive). Number of contacts found shown in the status message. -
Test case:
findAny t/owesMoney
Expected: 0 contacts displayed. Status message indicates 0 contacts are found. -
Test case:
findAny t/123!
Expected: No changes made. Error details are shown in the status message. -
Other incorrect untag commands to try:
findAny,findAny t/<valid tag> c/,....
Expected: No changes made. Error details are shown in the status message.
-
- Find a contact by tag and name
-
Prerequisites: Multiple contacts in the list with one contact with name Roy having tag name colleagues and one with name Adam having tag name Colleagues.
- Test case:
findAny n/Roy t/Colleagues
Expected: Displays contacts with tag colleagues (case-insensitive) or whose name contains Roy. Number of contacts found shown in the status message. Both Adam and Roy are within the list. - Test case:
findAny c/ n/Roy t/Colleagues
Expected: Displays contacts with tag Colleagues (case-sensitive) or whose name contains Roy. Number of contacts found shown in the status message. Both Adam and Roy are within the list. -
Test case:
findAny n/Roy t/123!
Expected: No changes made. Error details are shown in the status message. - Other incorrect untag commands to try:
findAny,findAny t/<valid tag> n/<valid name> c/,....
Expected: No changes made. Error details are shown in the status message.
-
Deleting a contact
-
Deleting a contact while all contacts are being shown
-
Prerequisites: List all contacts using the
listcommand. Multiple contacts in the list. -
Test case:
delete 1
Expected: First contact is deleted from the list. If deleted contact has a birthday, it’s birthday reminder message is deleted from the birthday reminder list. Details of the deleted contact are shown in the status message. -
Test case:
delete 0
Expected: No contact is deleted. Error details are shown in the status message. The status bar remains the same. -
Other incorrect delete commands to try:
delete,delete x,...(where x is larger than the list size)
Expected: No contact is deleted. Error details are shown in the status message. The status bar remains the same.
-
-
Deleting a contact while some contacts are being shown
-
Prerequisites: View only some contacts using the
findorfindAnycommand. Multiple contacts in the list. -
Test Case:
delete 1
Expected: First contact that is being viewed is deleted from the list. Details of the deleted contact are shown in the status message. -
Test case:
delete 0
Expected: No contact is deleted. Error details are shown in the status message. -
Other incorrect delete commands to try:
delete,delete x,...(where x is larger than the size of the contacts that are currently being viewed).
Expected: No contact is deleted. Error details are shown in the status message.
-
Deleting multiple contacts
- Deleting multiple contacts while all contacts are being shown
-
Prerequisites: List all contacts using the
listcommand. At least 10 contacts in the list. -
Test case:
deletem 8 - 10
Expected: Eighth, ninth and tenth contact deleted from the list. If deleted contact has a birthday, its birthday reminder message is deleted from the birthday reminder list. Details of the deleted contact are shown in the status message. -
Test case:
deletem 6 - 4
Expected: No contact is deleted since the end index is smaller than the start index. Error details are shown in the status message. The status bar remains the same. -
Other incorrect delete commands to try:
deletem,deletem -2 - -1,deletem x - y,...(where x is not less than y, either x or y is not a positive integer within list size currently being viewed).
Expected: No contact is deleted. Error details are shown in the status message. The status bar remains the same.
-
- Deleting a contact while some contacts are being shown
-
Prerequisites: View only some contacts using the
findorfindAnycommand. At least 10 contacts in the list are displayed. -
Test case:
deletem 8 - 10
Expected: Eighth, ninth and tenth contact deleted from the list. If deleted contact has a birthday, its birthday reminder message is deleted from the birthday reminder list. Details of the deleted contact are shown in the status message. -
Test case:
deletem 6 - 4
Expected: No contact is deleted since the end index is smaller than the start index. Error details are shown in the status message. The status bar remains the same. -
Other incorrect delete commands to try:
deletem,deletem -2 - -1,deletem x - y,...(where x is not less than y, either of x or y is not a positive integer within the list size currently being viewed).
Expected: No changes made. Error details are shown in the status message.
-
Pinning a contact
-
Pinning a contact
-
Prerequisites: Contact at index 1 pinned and index 2 not pinned.
-
Test case:
pin 2
Expected: Contact at index 2 pinned. Details of the recently pinned contact are shown in the status message. -
Test case:
pin 1
Expected: No changes made. Error details are shown in the status message. -
Other incorrect pin commands to try:
pin,pin -1,pin x,...(where x is larger than the size of the contacts that are currently being viewed).
Expected: No changes made. Error details are shown in the status message.
-
Unpinning a contact
-
Unpinning a contact
-
Prerequisites: Contact at index 1 pinned and index 2 not pinned.
-
Test case:
unpin 1
Expected: Contact at index 1 unpinned. Details of the recently unpinned contact are shown in the status message. -
Test case:
unpin 2
Expected: No changes made. Error details are shown in the status message. -
Other incorrect unpin commands to try:
unpin,unpin -1,unpin x,...(where x is larger than the size of the contacts that are currently being viewed).
Expected: No changes made. Error details are shown in the status message.
-
Tagging a contact
-
Tagging a contact with multiple tags
-
Prerequisites: Contact at index 1 has no tags and contact at index 2 has tag of friends.
-
Test case:
tag 1 t/johnBirthday t/party
Expected: Tags added to contact at index 1. Details of the tags added to contact are shown in the status message. -
Test case:
tag 2 t/friends
Expected: No changes to the contact. Warning details about existing tag(s) are shown in the status message. -
Test case:
tag 2 t/party t/friends
Expected: New tag is added to the contact. Warning details about existing tag(s) are shown in the status message. -
Other incorrect tag commands to try:
tag,tag -1 t/<valid tag name>,tag 1 t/<tag name longer than 60 characters>,....
Expected: No changes to contacts. Error details are shown in the status message.
-
Untagging a contact
-
Untagging a contact
-
Prerequisites: Contact at index 1 has tags johnBirthday and party and contact at index 2 has no tags.
-
Test case:
untag 1 t/johnBirthday t/party
Expected: Removes specified tags from contact at index 1. Details of the removed tags are shown in the status message. -
Test case:
untag 2 t/party
Expected: No changes made. Error details are shown in the status message. -
Other incorrect untag commands to try:
untag,untag -1 t/<valid tag name>,....
Expected: No changes made. Error details are shown in the status message.
-
Export Mailing List Command
- Export contact list
-
Prerequisites: List all contacts using the
listcommand. -
Test case:
mailingList
Expected: Generate CSV file with name, phone and email of all contacts displayed in the list. -
Test case:
mailingList b/ a/
Expected: Generate CSV file with name, birthday and address of all contacts displayed in the list. -
Test case:
mailingList k/
Expected: No changes made. Error details are shown in the status message.
-
- Export Filtered contact list
-
Prerequisites: Filter contacts using the
findcommand. -
Test case: variations on
mailingListas above
Expected: Same result as exporting full contact list, but with only the contacts displayed in the filtered list
-
- Export Empty contact list
-
Prerequisites: Filter contacts using the
findcommand. -
Test case:
mailingList
Expected: Exporting a mailing list of 0 contacts is not allowed. Error details are shown in the status message.
-
Saving data
- Dealing with missing/corrupted data files
-
Prerequisite: Have some contacts saved in
[JAR file location]/data/CONNECTIONS.json. -
Test Case: edit the first contact name to
Alice Leeand launch CONNECTIONS
Expected: CONNECTIONS launches successfully. The first contact’s name is changed toAlice Lee. -
Test Case: edit the first contact email to
hellogmailand launch CONNECTIONS
Expected: CONNECTIONS launches successfully with 0 contacts. -
Other incorrect formatting of data or invalid fields: birthday to
00000000, phone tomynumber,...
Expected: CONNECTIONS launches successfully with 0 contacts.
-